

Anatomy of a Mode - Darkside of the Mode
This is the first volume of my Vectr preset breakdown. In these posts I will be breaking down all elements of my presets to better explain the intricacies of Vectr.
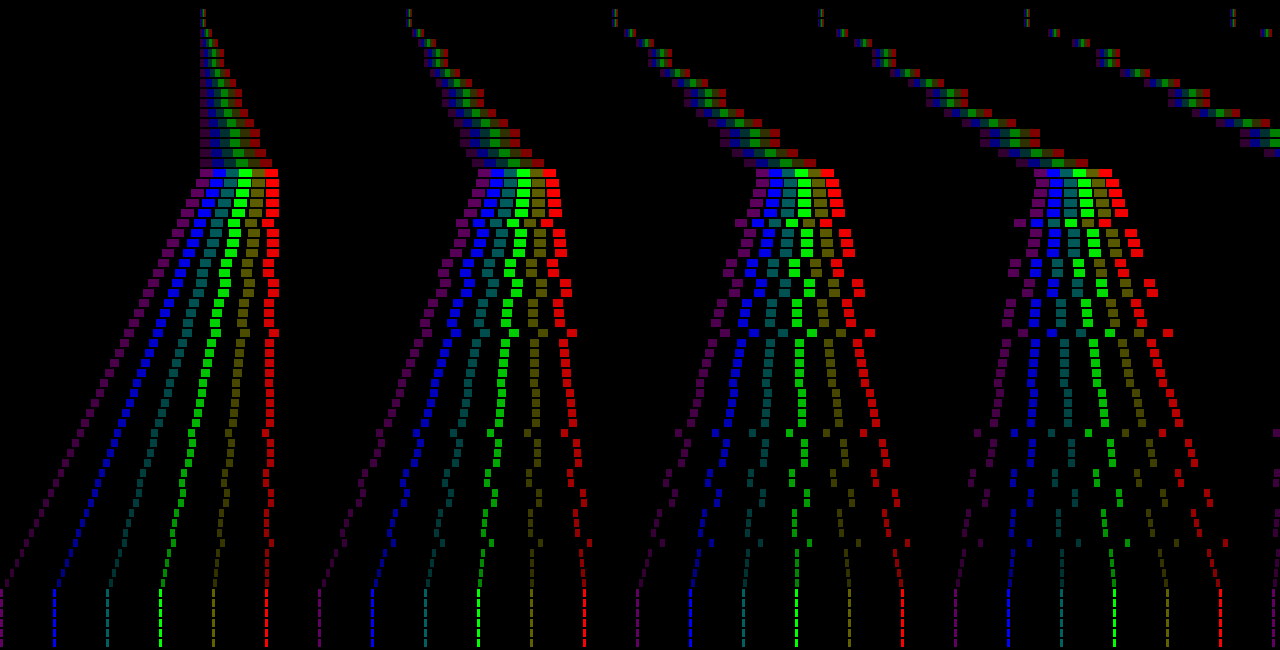
Darkside of the Mode
Darkside is one of my favorite modes because it shows off some of the optical illusionesque things you can do with an LED that blinks fast enough. While the idle blinke-like pattern appears white, there is no white used in any of the palettes. As the light moves faster, the blinke turns into a rainbow stribbon before splitting apart into it’s component colors in a half-time dops. The effect is similar to how a prism breaks apart white light.
Pattern and Arguments
Darkside is a simple strobe, by that I mean the “Group Size” is 0 (select all colors), the “Skip After” is 0 (no change in the order), and the “Repeat Group” is 1. Nothing fancy going on here. The magic’s all in the colors and the timings.
Timings and Timing Thresholds
We’re using 3 levels of timing blends here. From 0 (idle/1G) to 16 (2Gs) the only timing that changes is the strobe length. Since we’re going for a Blinke-like pattern here, we want the blank time to be 0 and the gap time to be somewhat long. In this case, the gap time is 100ms. So from 1G to 2Gs we have:
- Strobe from 0.5ms to 6.5ms
- Blank 0ms
- Gap 100ms
This is how I created the “hidden rainbow” effect. The faster you are going between idle and +1G, the longer the color trail for each color. After that 2G mark we blend from this Stribbon-like pattern to a half-time dops. I’m not using the full range here as I want the dops to appear before the maximum detected speed. In this case, it’s from 16 (2Gs) to 56 (4.5Gs):
- Strobe from 6.5ms to 1.5ms
- Blank from 0ms to 25ms
- Gap from 100ms to 0ms
So during this transition, the gap time decreases down to nothing while the blank time increases to 25ms and the strobe shortens to a 1.5ms dops. This causes the stribbon to “break apart” into mini strobes, strobies, and dops depending on your speed.
Colors and Color Thresholds
As mentioned, Darkside’s an attempt to show off some of the optical illusion created by strobing very quickly. Our eyes cannot discern 0.5ms strobes stacked back-to-back. Instead they average the color over time. The colors used in Darkside are the 3 primary additive colors (red, green, and blue) and the 3 secondary colors in between those (yellow - red + green, cyan - green + blue, and magenta - blue + red). The secondary colors use values less than half the primary color. Brightness on an LED is not linear, so halving the value (e.g. red = 255, 0, 0 and yellow = 128, 128, 0) would cause the secondary colors to appear brighter than the primaries. I’ve found that a value around 1/3 approximates the same brightness across all colors. Strobing these colors back-to-back very quickly results in the eye seeing white rather than color.
The final effect is to brighten the colors as you speed up. I’ve disabled the third color set by setting the last two color threshold values to 64. Setting the last 2 to 64 effectively disables that set. Setting all 4 to 64 would make the mode function without color blending. The second color set is twice as bright as the first and is set to blend from 0 (1G) to 56 (4.5G) to match the timing blend.
Conclusion
Darkside is a relatively simple mode that’s mostly conceptual rather than technical. If you find yourself not a fan of rainbow presets in general, it’s very easy to mix up the color palette and find colors that are more suitable for your sets. Play around with the colors but take care to keep the brightnesses somewhat even through the stribbon. If you’d like to use dim colors, either move to three color sets with the thresholds matching the timings and only use the dim colors in the third set. Dim colors during the blinke or stribbon parts is damaging to the effect and makes a weird flickering that I’ve found undesireable.
Stay tuned for more mode breakdowns and let me know what cool things you come up with.